

Rail fish plates, also known as rail joint bars, are essential components in railway construction and maintenance. They serve to connect two sections of rail, ensuring a smooth transition for trains while maintaining the structural integrity of the track. Proper installation of rail fish plates is crucial for safety and performance. This blog will guide you through the process of installing rail fish plates, covering the necessary tools, steps, and best practices.
Understanding Rail Fish Plates
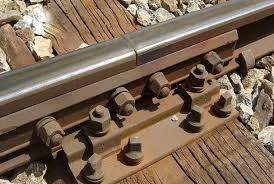
What Are Rail Fish Plates?
Rail fish plates are flat metal bars that are bolted to the ends of two adjacent rail sections. They help maintain alignment and stability, preventing misalignment that could lead to derailments or other safety issues. Fish plates are typically made of steel and come in various sizes and designs to accommodate different rail types and configurations.
Importance of Proper Installation
The installation of rail fish plates is critical for the overall safety and efficiency of railway operations. Improperly installed fish plates can lead to track misalignment, increased wear on the rails, and potential derailments. Therefore, understanding the installation process and adhering to best practices is essential for railway maintenance personnel.

Tools and Materials Needed
Before starting the installation process, gather the following tools and materials:
Tools
Wrenches: A set of adjustable wrenches or socket wrenches for tightening bolts.
Torque Wrench: To ensure bolts are tightened to the specified torque.
Rail Saw: If adjustments to the rail length are necessary.
Hammer: For driving in any necessary pins or adjusting the fish plates.
Measuring Tape: To ensure proper alignment and spacing.
Level: To check the alignment of the rails.
Safety Gear: Gloves, safety glasses, and hard hats for personal protection.
Materials
Rail Fish Plates: Ensure you have the correct type and size for your rail.
Bolts and Nuts: Use high-strength bolts that meet railway standards.
Washers: To distribute the load and prevent damage to the rail.
Lubricant: For bolts, to reduce friction and prevent corrosion.
Step-by-Step Installation Process
Step 1: Prepare the Work Area
Before beginning the installation, ensure that the work area is safe and free from obstructions. Clear any debris or obstacles around the rail sections. If necessary, use warning signs or cones to alert others of the work being performed.
Step 2: Inspect the Rails
Examine the ends of the rails where the fish plates will be installed. Look for any signs of wear, damage, or corrosion. If the rails are damaged, they may need to be replaced or repaired before proceeding with the installation.
Step 3: Align the Rails
Position the two rail sections that will be connected by the fish plate. Use a measuring tape to ensure that the ends of the rails are aligned properly. The gap between the rail ends should be minimal, typically no more than 1/8 inch (3 mm). Use a level to check that the rails are at the same height.
Step 4: Position the Fish Plate
Once the rails are aligned, place the fish plate over the joint, ensuring that it covers both rail ends evenly. The fish plate should be centered on the joint, with equal overhang on both sides. If necessary, adjust the position of the rails to achieve proper alignment.
Step 5: Insert Bolts and Washers
With the fish plate in position, insert the bolts through the holes in the fish plate and into the pre-drilled holes in the rail ends. Place washers on both sides of the fish plate to distribute the load evenly. Ensure that the bolts are of the correct length to accommodate the thickness of the fish plate and the rails.
Step 6: Tighten the Bolts
Using a wrench, tighten the bolts by hand until they are snug. Then, use a torque wrench to tighten the bolts to the manufacturer’s specified torque settings. This step is crucial to ensure that the fish plate is securely fastened and that the rails remain aligned.
Step 7: Inspect the Installation
After tightening the bolts, inspect the installation to ensure everything is in order. Check that the fish plate is properly aligned and that there are no gaps between the rail ends. Use a level to confirm that the rails are still at the same height.
Step 8: Test the Installation
Once the installation is complete, it is essential to test the joint. This can be done by running a train over the newly installed fish plate at a low speed. Monitor the joint for any signs of movement or misalignment. If any issues arise, stop the train and inspect the installation again.

Best Practices for Installing Rail Fish Plates
1. Regular Maintenance
Regularly inspect and maintain rail fish plates to ensure their longevity and effectiveness. Look for signs of wear, corrosion, or loosening of bolts. Address any issues promptly to prevent larger problems down the line.
2. Use Quality Materials
Always use high-quality fish plates, bolts, and washers that meet industry standards. This will ensure the safety and reliability of the installation.
Conclusion
Installing rail fish plates is a critical task in railway maintenance that requires attention to detail and adherence to best practices. By following the steps outlined in this guide, railway personnel can ensure a safe and effective installation that enhances the integrity of the rail system. Regular maintenance and inspections will further contribute to the longevity and reliability of the railway infrastructure, ultimately ensuring safe and efficient transportation for all.
https://www.hbrailwayfastening.com/How-to-install-Rail-Fish-Plate.html